I am going to show you how you can modify the standard ListBox control used in Silverlight 2.0. Many people want to change the default view of this control but they can’t remove the line between the items. If you download the code of the Silverlight control from the official site of Microsoft you will see that after every item there is a line. In this example I will show you how you can remove this line.
Let’s create e new Silverlight 2.0 application and place a ListBox in it.
|
1 2 3 4 5 6 7 8 9 10 11 12 13 |
<ListBox> <ListBox.Items> <ListBoxItem Content="I am the first item in the collection" /> <ListBoxItem Content="I am the second item in the collection" /> </ListBox.Items> </ListBox></pre> <!--more-->In order to change the default look of our items we have to modify the <a href="http://msdn2.microsoft.com/en-us/library/system.windows.controls.itemscontrol.itemcontainerstyle.aspx" target="_blank">ItemContainerStyle</a> property of out ListBox control. <pre lang="xml"><ListBox.ItemContainerStyle> <Style TargetType="ListBoxItem"> <Setter Property="Background" Value="LightBlue" /> <Setter Property="Template"></Setter> </Style> </ListBox.ItemContainerStyle> |
In order to change the default look of our items we have to modify the ItemContainerStyle property of out ListBox control.
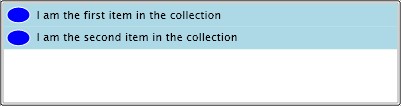
Template contains the style of each item in the ListBox. If you look at the generics.xaml (the source file of the controls) you will see how it is created by default. We will replace this style by creating a new one: each item will contains a ellipse and a text after it. That’s why we are going to create a Grid with two columns: first of them will contain the ellipse and the second one – the textblock
|
1 2 3 4 5 6 7 8 9 10 11 12 13 14 15 16 17 18 19 20 |
<Setter Property="Template"> <Setter.Value> <ControlTemplate TargetType="ListBoxItem"> <Grid x:Name="RootElement" Background="{TemplateBinding Background}"> <Grid.RowDefinitions> <RowDefinition Height="*"/> <RowDefinition Height="Auto"/> </Grid.RowDefinitions> <Grid.ColumnDefinitions> <ColumnDefinition Width="30" /> <ColumnDefinition Width="*" /> </Grid.ColumnDefinitions> <Ellipse Fill="Blue" Stroke="White" StrokeThickness="1" Grid.Column="0" Margin="3" /> <ContentPresenter Grid.Column="1" Content="{TemplateBinding Content}" ContentTemplate="{TemplateBinding ContentTemplate}" Margin="3" /> </Grid> </ControlTemplate> </Setter.Value> </Setter> |
And that’s it! We have our ListBox control modified! If you see there is no indication when you have selected an item. This is because we have not provided Storyboards for this. You can see in the sorce of this control how it is implemented and you can then easily modify it.